
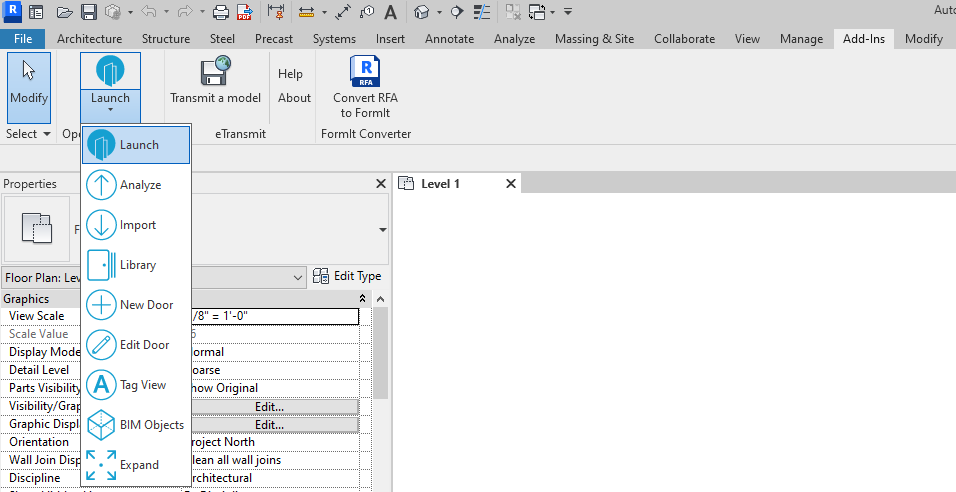
Revit® Ribbon
After the Openings Studio plugin has been installed, open a project in Revit®.
Openings Studio is added as a tab on the Ribbon by default.

If you prefer to not see Openings Studio as a tab, use the Shrink button to move it to the Add-Ins tab.

It can be added back as a tab by clicking Expand.
What’s on the menu?

Launch: Launch Openings Studio.
Analyze: Extract project information from Revit® into Openings Studio (e.g. phases, design options, linked models, floor plans and PDFs).
Import: Import information that has been exported from Openings Studio back into Revit®. (This button is typically required if an Internet connection is lost when exporting. Otherwise, it is not used.)
Library: Open a list of libraries built in Openings Studio and families that can be exported back into Revit®.
New Door: Create and add a new door family on-the-fly to the project file.
Edit Door: Replace an instance in the model with a new door family. First select an opening in a Revit® project. Then click the Edit Door icon. No families are deleted or actually edited in the file, a new door is just added in place of the instance selected.
Tag View: Select plan views to see exported/imported tagged parameters for electrical components.
BIM Objects: A website will open with downloadable families created by and for ASSA ABLOY.
Shrink / Expand: Expand to add Openings Studio to the Revit® Ribbon. Shrink to remove Openings Studio from the Revit® Ribbon and make visible in Add-Ins.