Working with doors in Autodesk® Revit® can be a daunting task. In-between selecting what doors to use, deciding their functions, and placing them in the model, there are also the technical BIM aspects of setting up the door schedule. Making sure it is fully populated with accurate parameter values, sorted, and filtered in the way you like can often be a time consuming and detail-oriented task — where mistakes can lead to cascading and costly change orders. Luckily, Revit has great tools to structure and organize your work when it involves doors.
Standardize door families with consistent and schedulable parameters
Set up a library of door families that are consistent in how they operate, whether by creating your own or downloading readily available BIM content. In many cases, you will end up doing both. However, this requires some cleanup when deciding what type of parameters you want to use, for example, deleting unused parameters, and tweaking properties. If you work with linked models, or want to be able to reuse door schedules in future projects, you may want to consider using Shared Parameters.
Instance vs. Type Parameters
When weighing whether to use Instance or Type Parameters for your door families, it is helpful to think about how often the parameter value will differ on individual doors. For relatively stable and static values such as door dimensions, a Type parameter may be appropriate.
Specific door requirements, like whether access control is needed, usually depend on the unique circumstances of each individual door. In these cases, leveraging Instance-based parameters adds the flexibility needed to accommodate differences.
When deciding on what parameters to include in your families, you will want to think ahead and consider by whom and how the information is going to be used. For example, coordinating with the contractors, door hardware manufacturers, integrators, and installers is a great way to drill down into what information needs to be shown. Find out more.
Re-using door schedules from previous projects

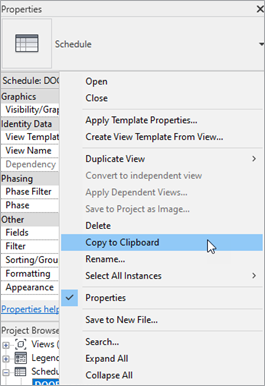
Once you have set up your firm libraries, the ability to re-use door schedules from past projects can be a significant time saver. To copy a door schedule between projects, start by opening up both the project that has the door schedule in it and your new project. In the old project, navigate to the door schedule in the project browser. Then, right click the name of the schedule that you would like to copy and select “Copy to clipboard’.
Navigate to your new project and press “Ctrl+V” to complete the transfer. Open the schedule and review for missing values. Apply your desired filters and sorting to complete your setup.
Note: you must use Shared Parameters in your door families to reuse door schedules.
Locating a door on your project

Once your doors are in order, Revit offers many built-in tools to help you find them throughout the project. For instance, if you have multiple floor plans open and want to locate a door, navigate to your door schedule. Select the door that you would like to find, then click the highlight button in the Revit ribbon. This will search for that particular door in the opened plan views or through all of the views available if none are currently being shown. The former is faster, so it is recommended that you have the right plan view(s) open if you know a door’s approximate location.
Finding a door by its Revit ID
Sometimes when you work with plugins, Dynamo, or other tools, your best option for finding a door is by searching for it via Revit ID.
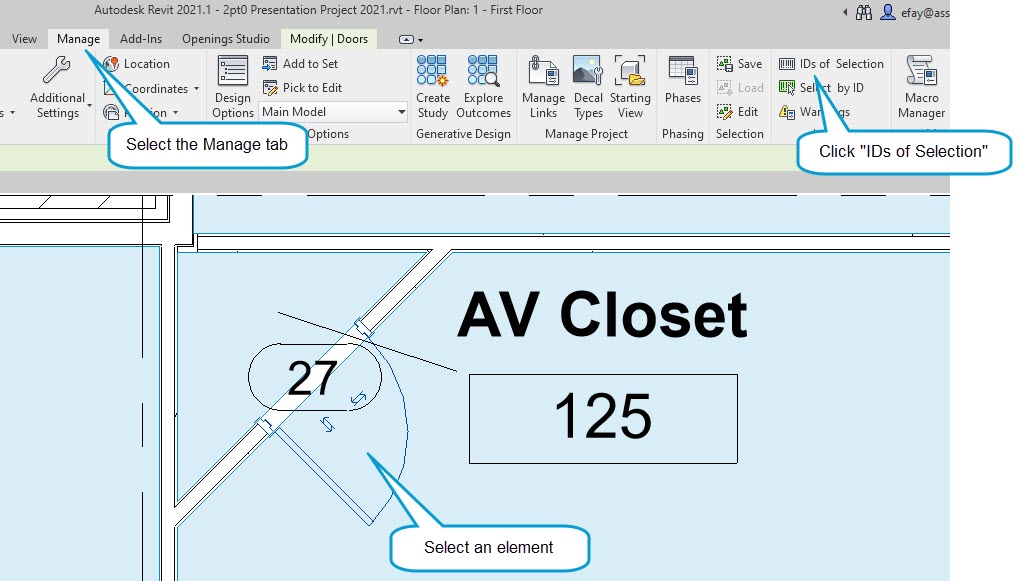
Under the Manage tab, click on “Select by ID” and type in the Revit ID.

Click "Show" and Revit will automatically navigate to and select the element. If the element cannot be found, it has likely been deleted from the project.

You can also find the Revit ID of an element by selecting it and clicking the "IDs of Selection" button.

Quickly download an Excel door schedule
When you need to quickly download an editable door schedule in a spreadsheet format, you open the Schedule in active mode, open the "File" menu, hover above "Export," and then select Schedule under "Report." This allows you to download a .txt file that you can then open up in Excel and delimit. For more details, you can check out our Openings Studio Knowledge Base article.
Unsure about whether your parameters are Instance or Type?
An easy way to tell is to select a door and then click “Edit Type” in the properties panel. The parameters listed here are Type parameters and can be browsed and edited per door family type. For more details, you can check out our Openings Studio Knowledge Base article.
Delete unused door families to optimize performance
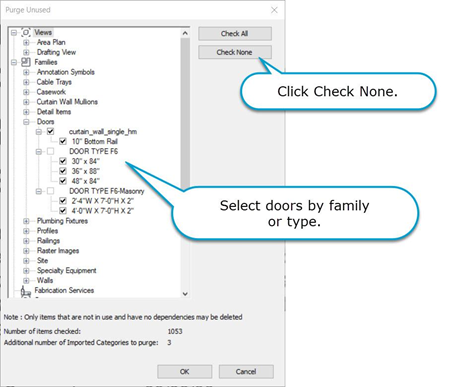
Finally, to further clean up your model in Revit and optimize performance, you can delete unused door families. To do so, navigate to the “Manage tab” and click the “Purge Unused” icon.

Click on the “Check None” button and then select the families that you would like to remove. Press "OK" and you are done!

Collaboration Tools Matter: Make your time investment pay off
Working with doors can be a considerable time investment up front, but if done correctly, you can save time and money on projects down the road.
We use Openings Studio to collaborate with architects on openings, providing the most accurate information at any given time on a project, with the parameters that you want. Openings Studio also offers its users free access to optional BIM content in sample Revit door family libraries, as well as easy to use tools to create your own door families for use in live projects.
Did you think this post was helpful? What are your best Revit door tips & tricks? What you would like in our next blog post? Let us know!
Learn about how Openings Studio integrates with both Autodesk® Revit® and GRAPHISOFT® Archicad® to deliver complete door hardware schedules and specifications faster and easier!
